In this page
Gmelius MCP Server
Set up the Gmelius MCP server in Claude, ChatGPT, Gemini, Cursor or VS Code. Let AI triage, assign, tag and draft replies in your Gmail shared inboxes.

In this page
Connect Gmelius to your AI agent (MCP)
Overview
Any AI agent that supports remote MCP servers can connect to Gmelius with one URL:
https://api.gmelius.com/public/v2/mcp
Once connected, the agent can work in your Gmelius shared inboxes on your behalf, with the same access you have in Gmelius:
- List your workspaces (shared inboxes, shared labels, personal inboxes)
- List and read conversations, including messages, tags and notes
- Assign or unassign conversations and change their status (open, pending, closed)
- Apply tags, and rename or recolor existing tags
- Create draft replies (never sent automatically) and internal notes
Before you start, check three things:
- You have a Gmelius account with access to the inboxes you want to use.
- Your AI tool supports remote MCP servers over Streamable HTTP with OAuth. Each section below says which plans qualify.
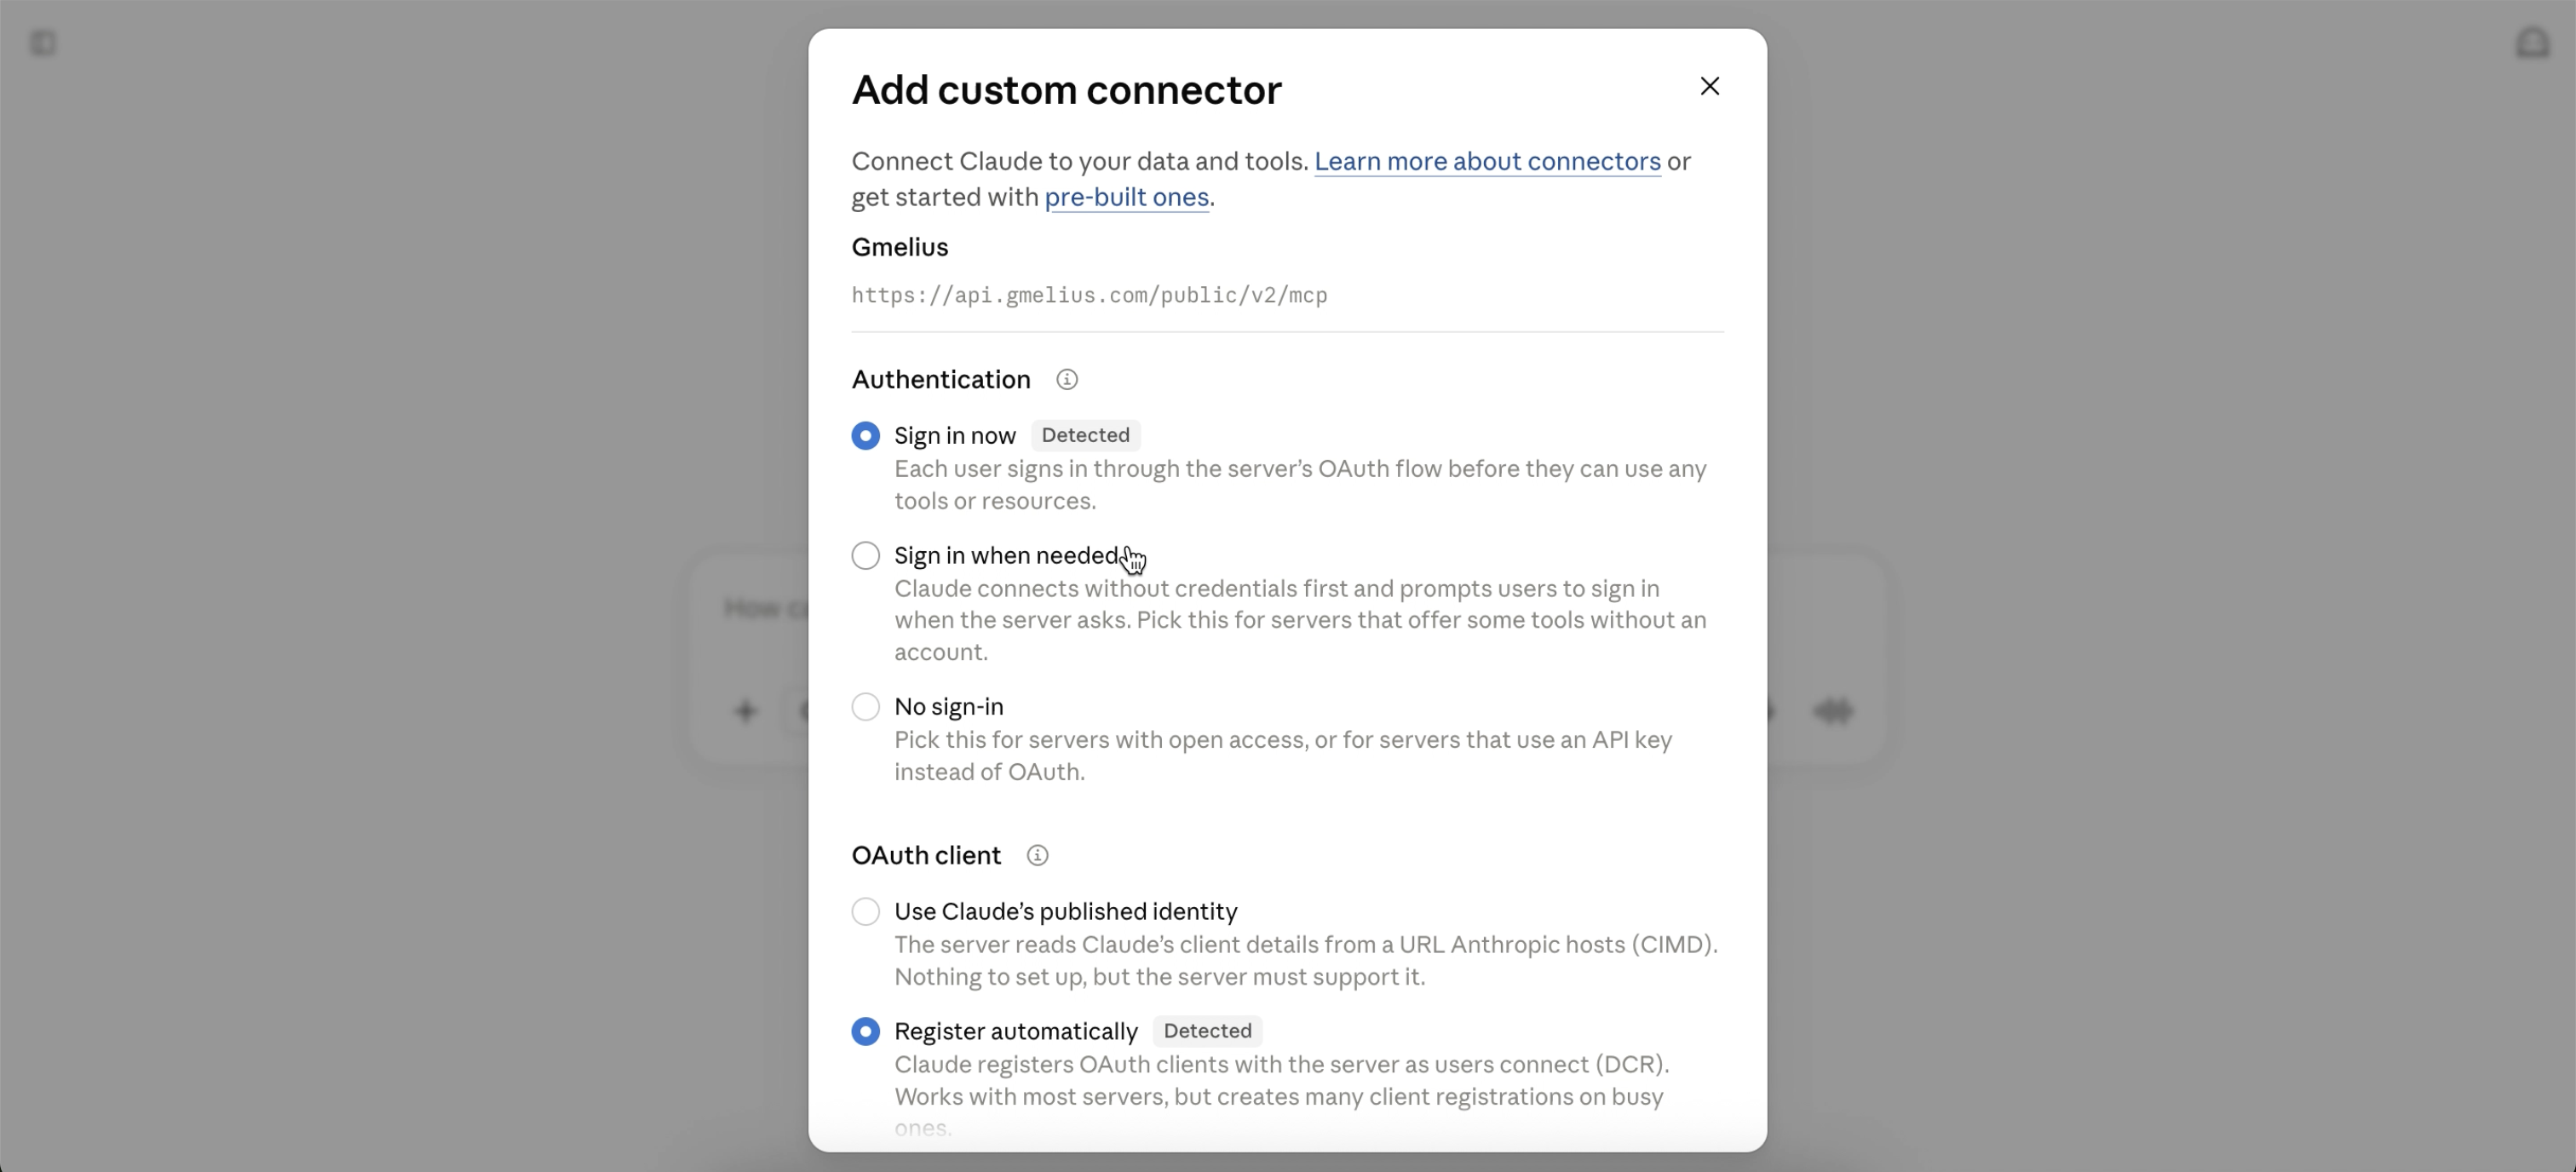
- You can sign in to Gmelius in a browser. Every tool opens a Gmelius sign-in page the first time you connect; there is no API key to copy.
Claude
Claude supports custom connectors on all plans; free accounts are limited to one custom connector. A connector added on claude.ai also works in Claude Desktop and the mobile apps.
claude.ai, Claude Desktop and mobile
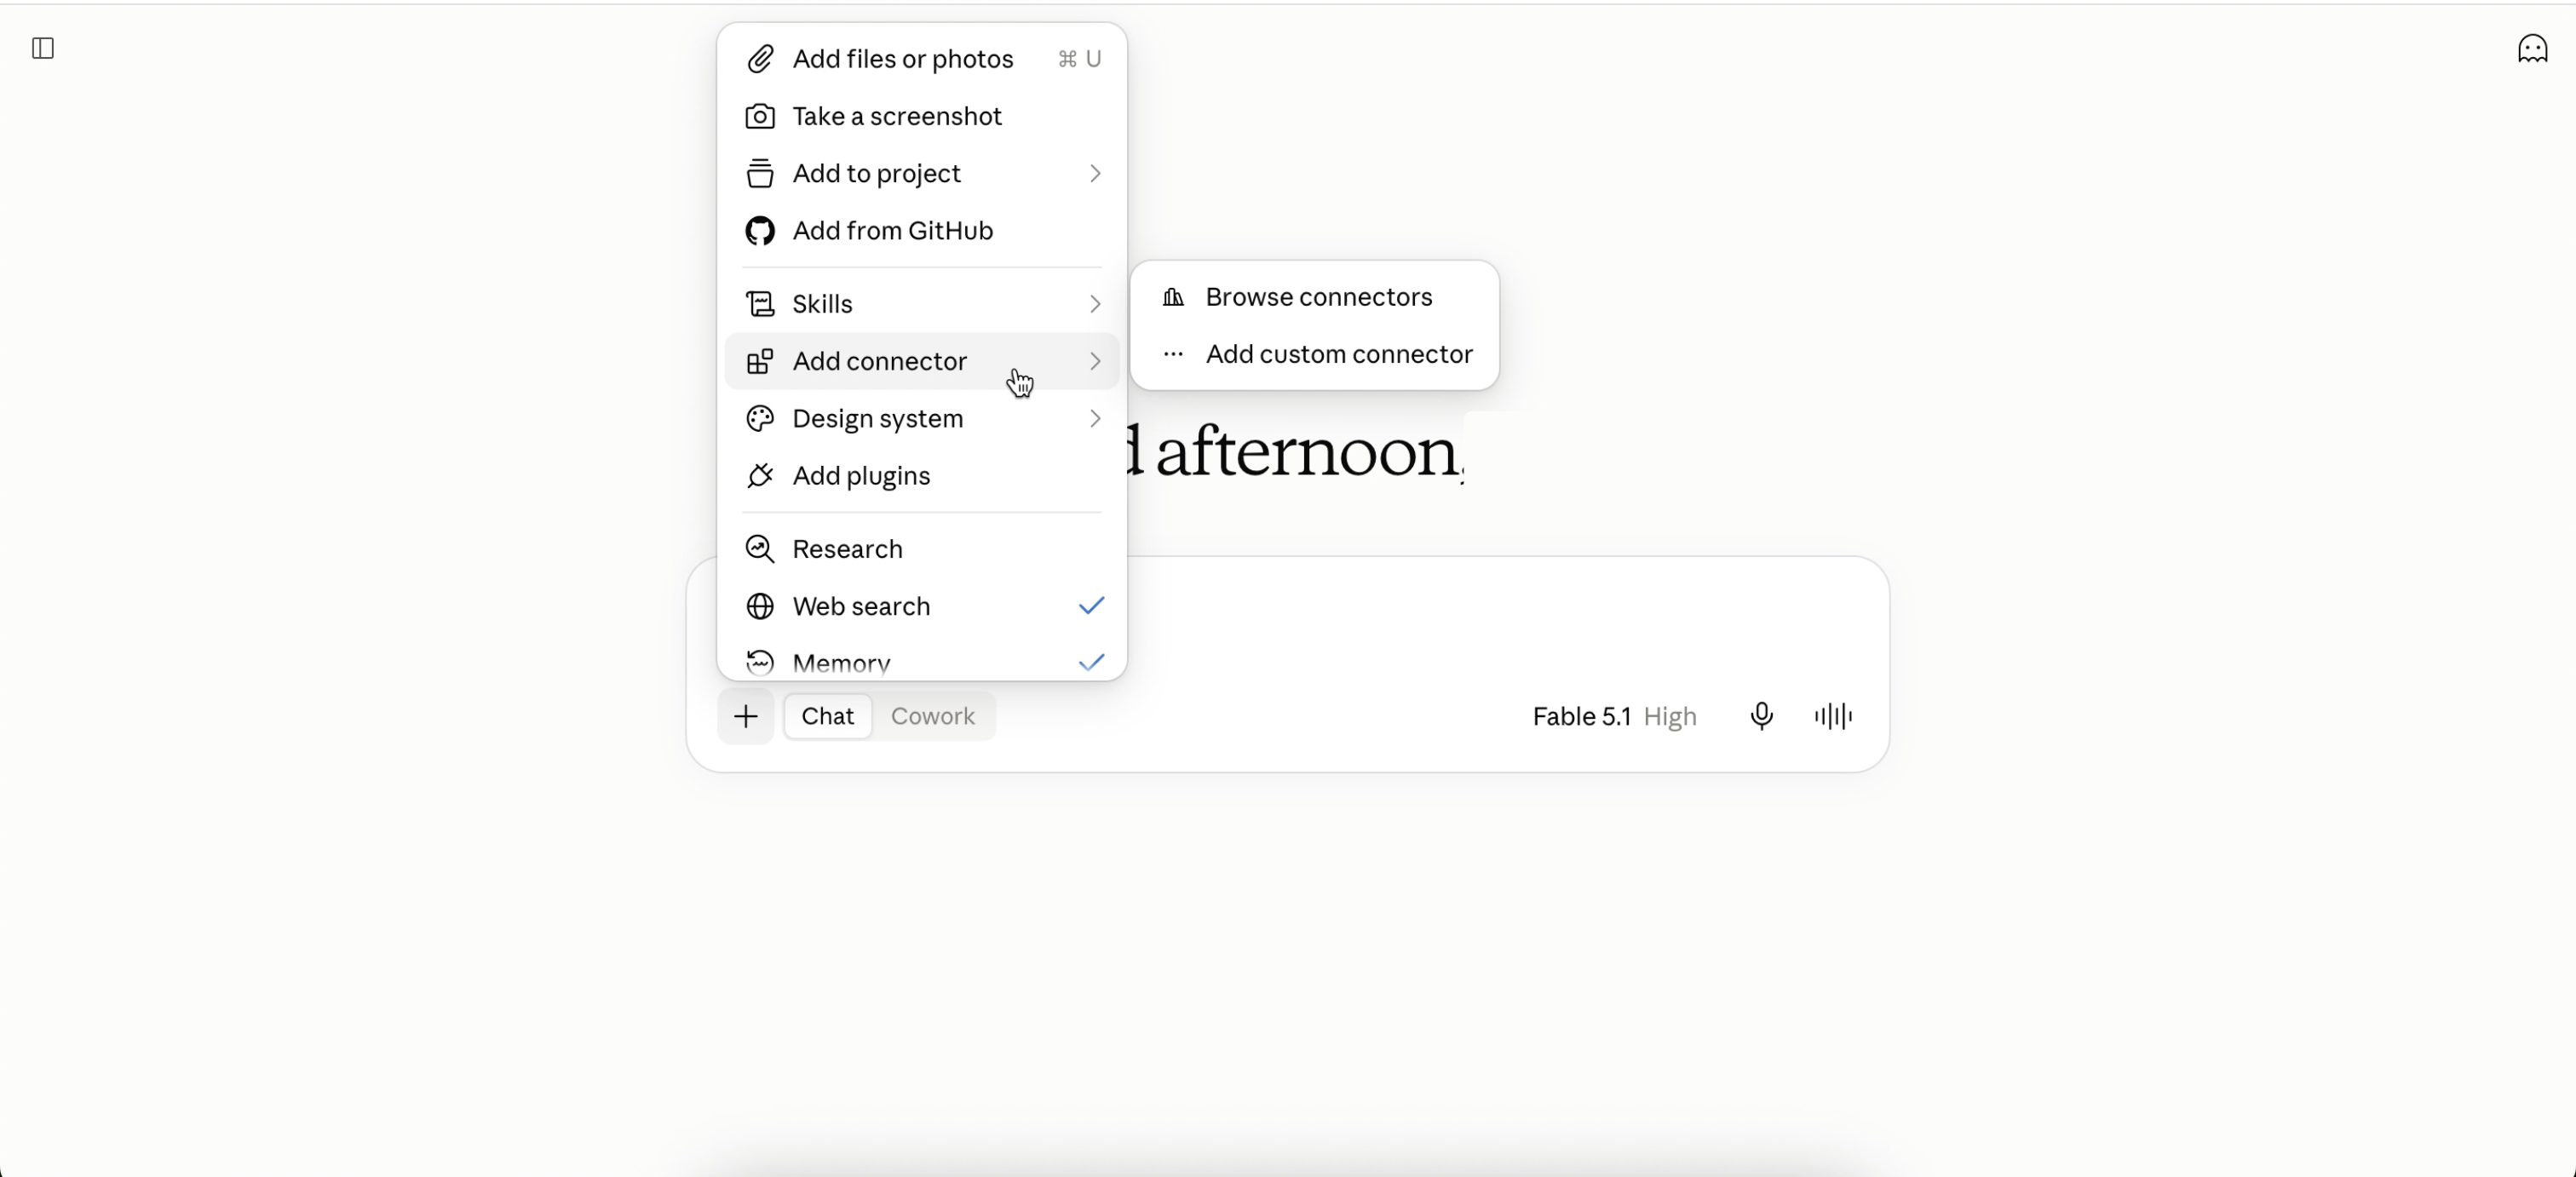
- On claude.ai or in Claude Desktop, open Settings → Connectors.
- Click Add custom connector.
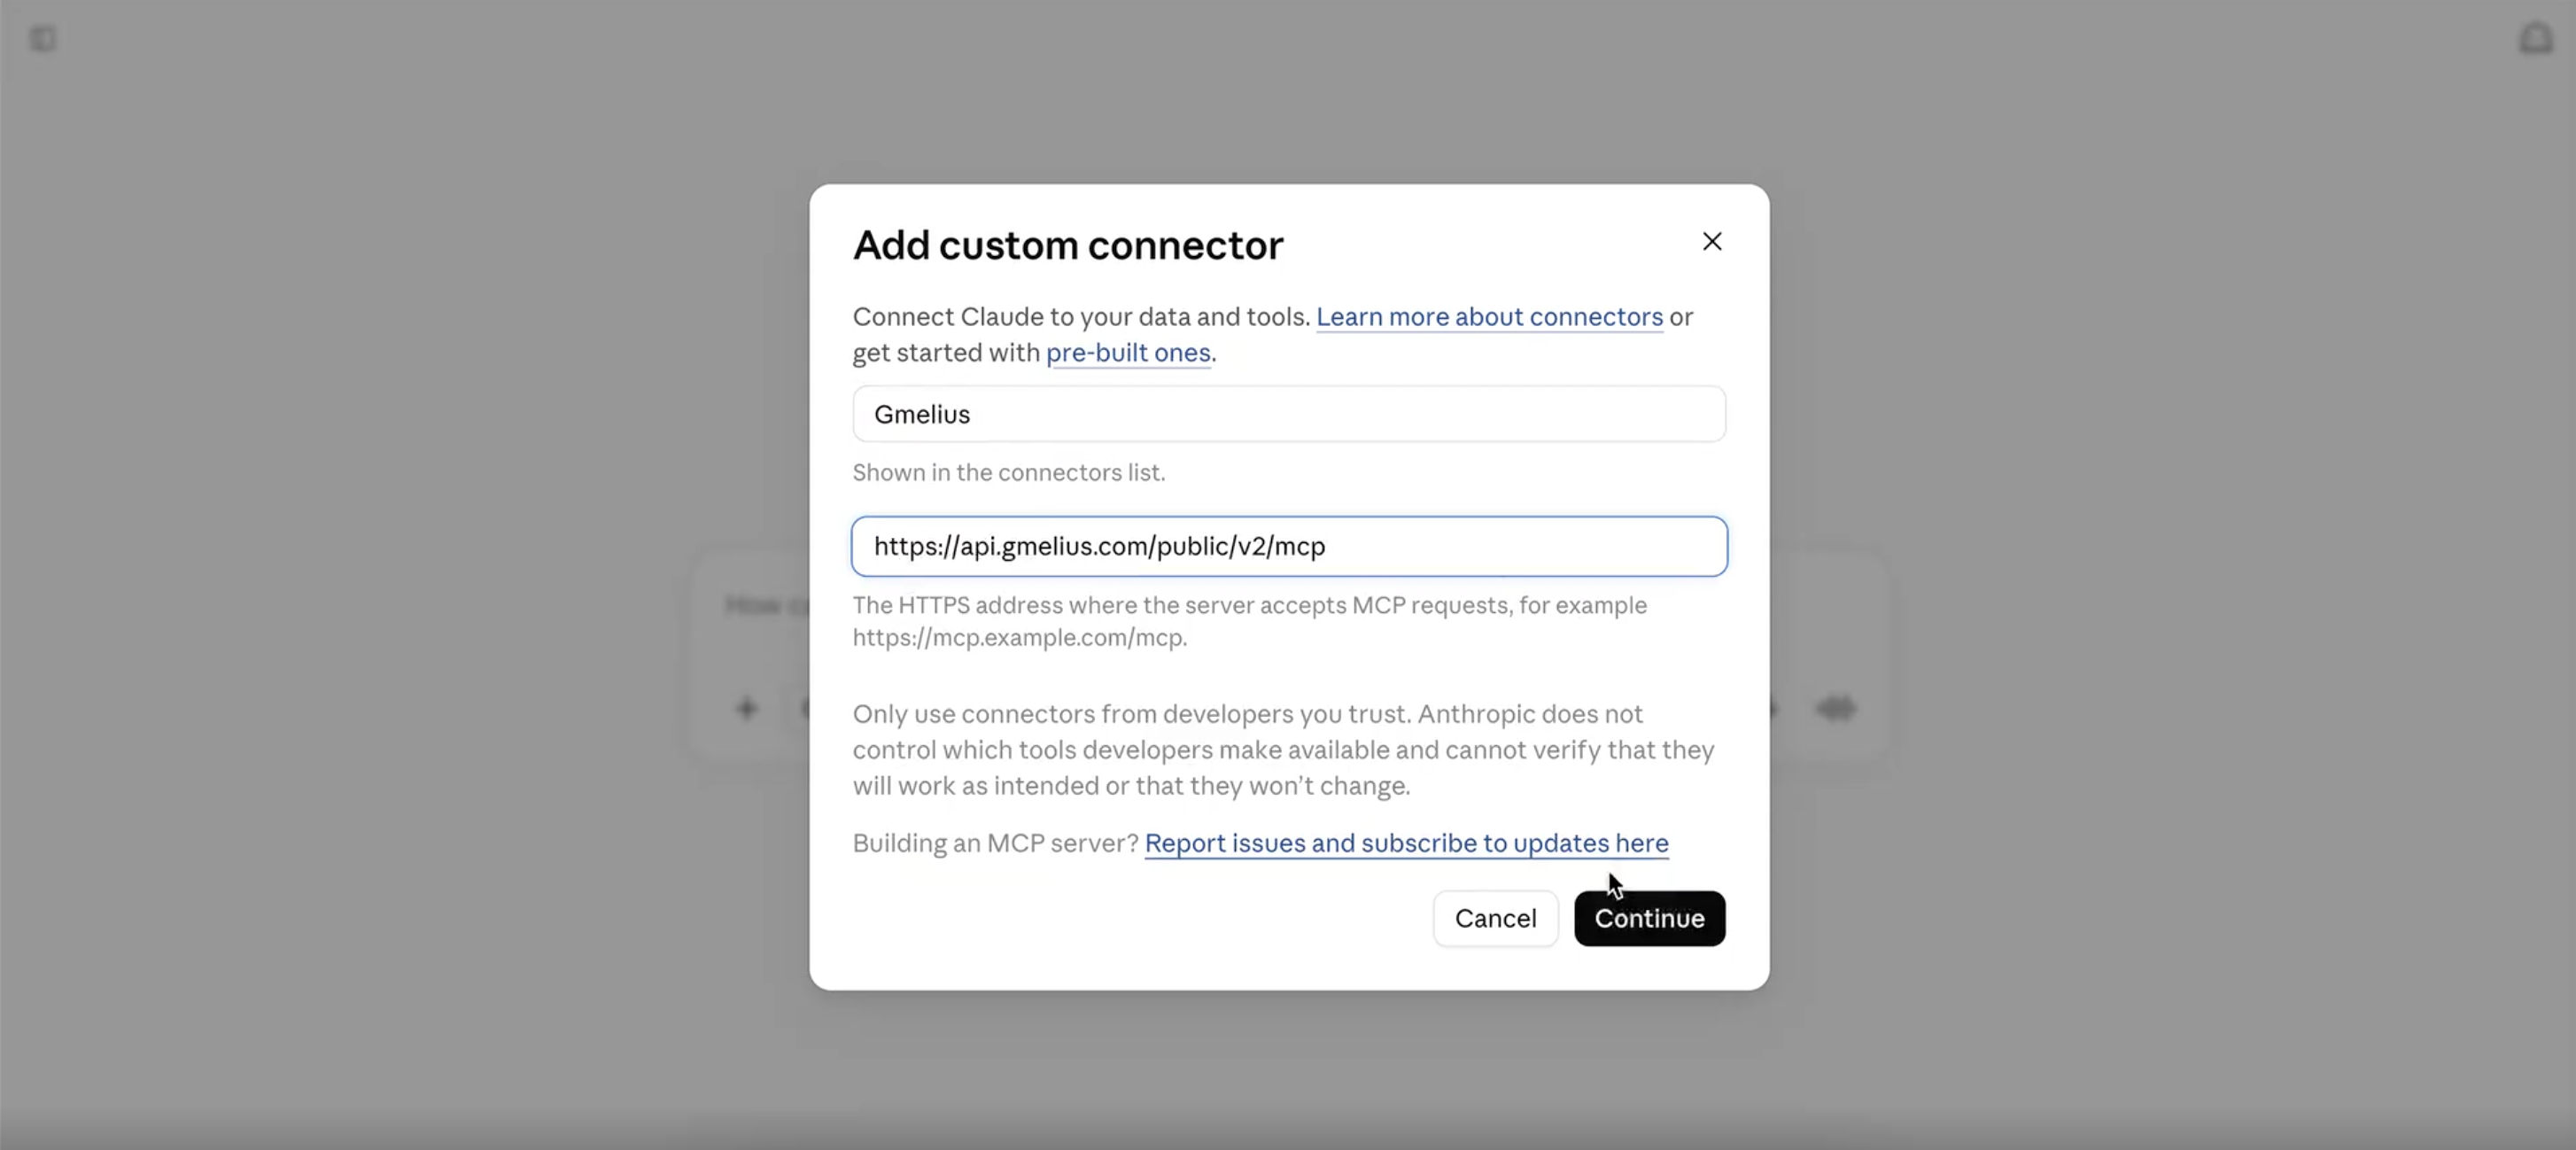
- Name it
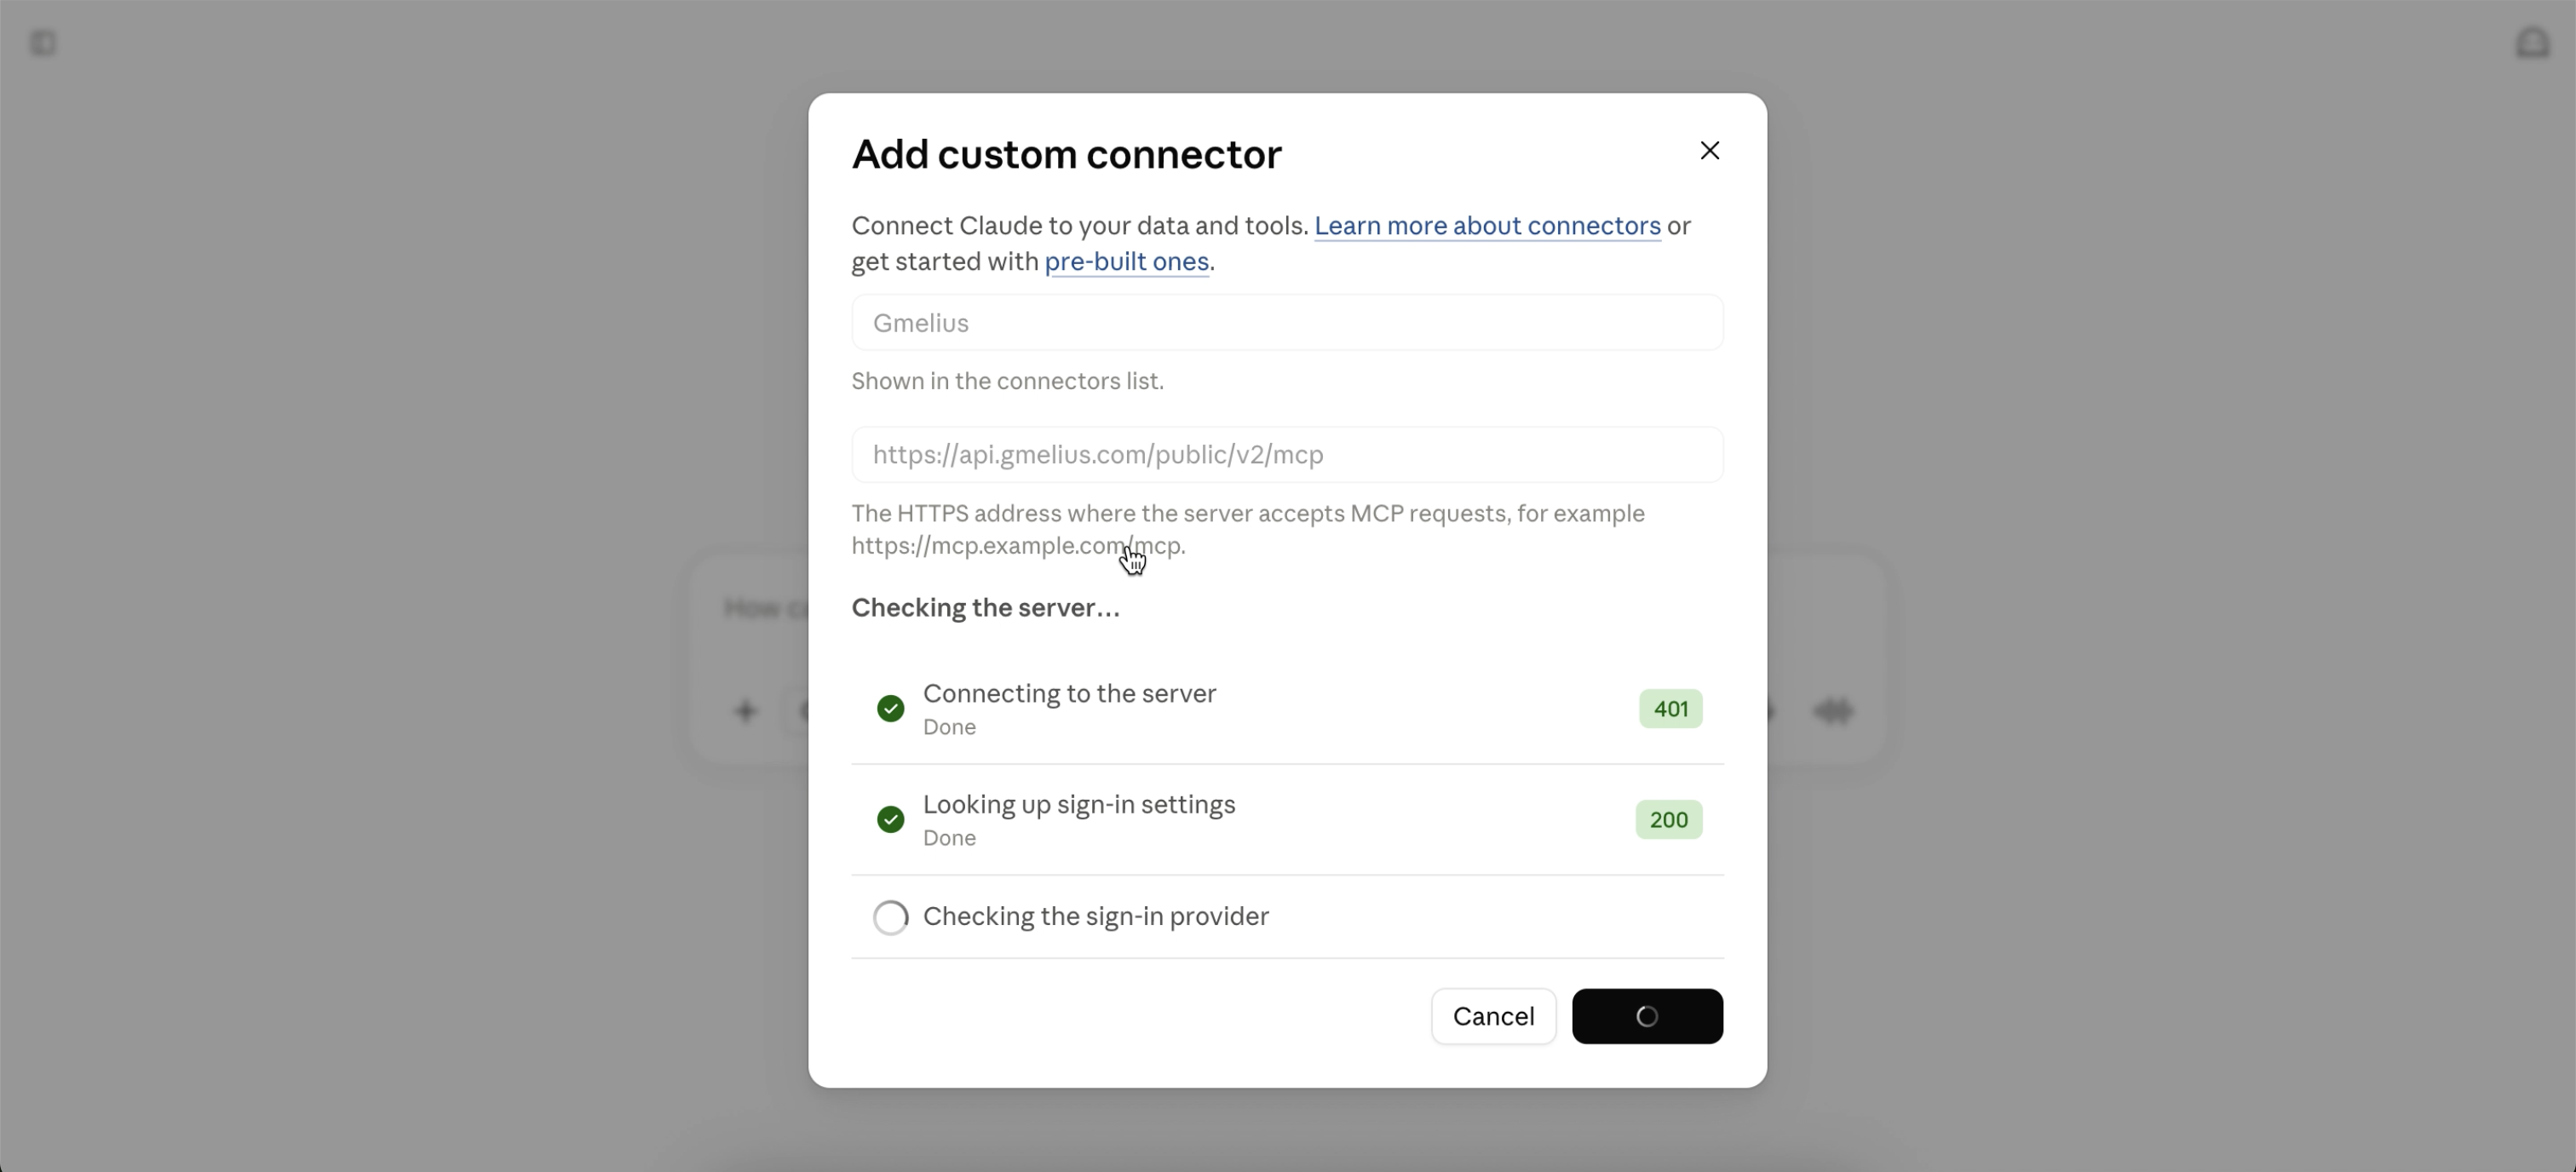
Gmeliusand pastehttps://api.gmelius.com/public/v2/mcpas the server URL. - Click Add, then Connect, and sign in to Gmelius in the window that opens.
- In a chat, open the tools menu and make sure Gmelius is switched on.
On Team and Enterprise plans, an owner may need to add the connector for the organization first.
Claude Code (terminal)
claude mcp add --transport http gmelius https://api.gmelius.com/public/v2/mcp
Start claude, run /mcp, select gmelius and choose Authenticate to sign in.
ChatGPT
ChatGPT needs Developer Mode, available on all plans (source). Developer Mode is required because Gmelius exposes action tools (assign, tag, draft), not just search.
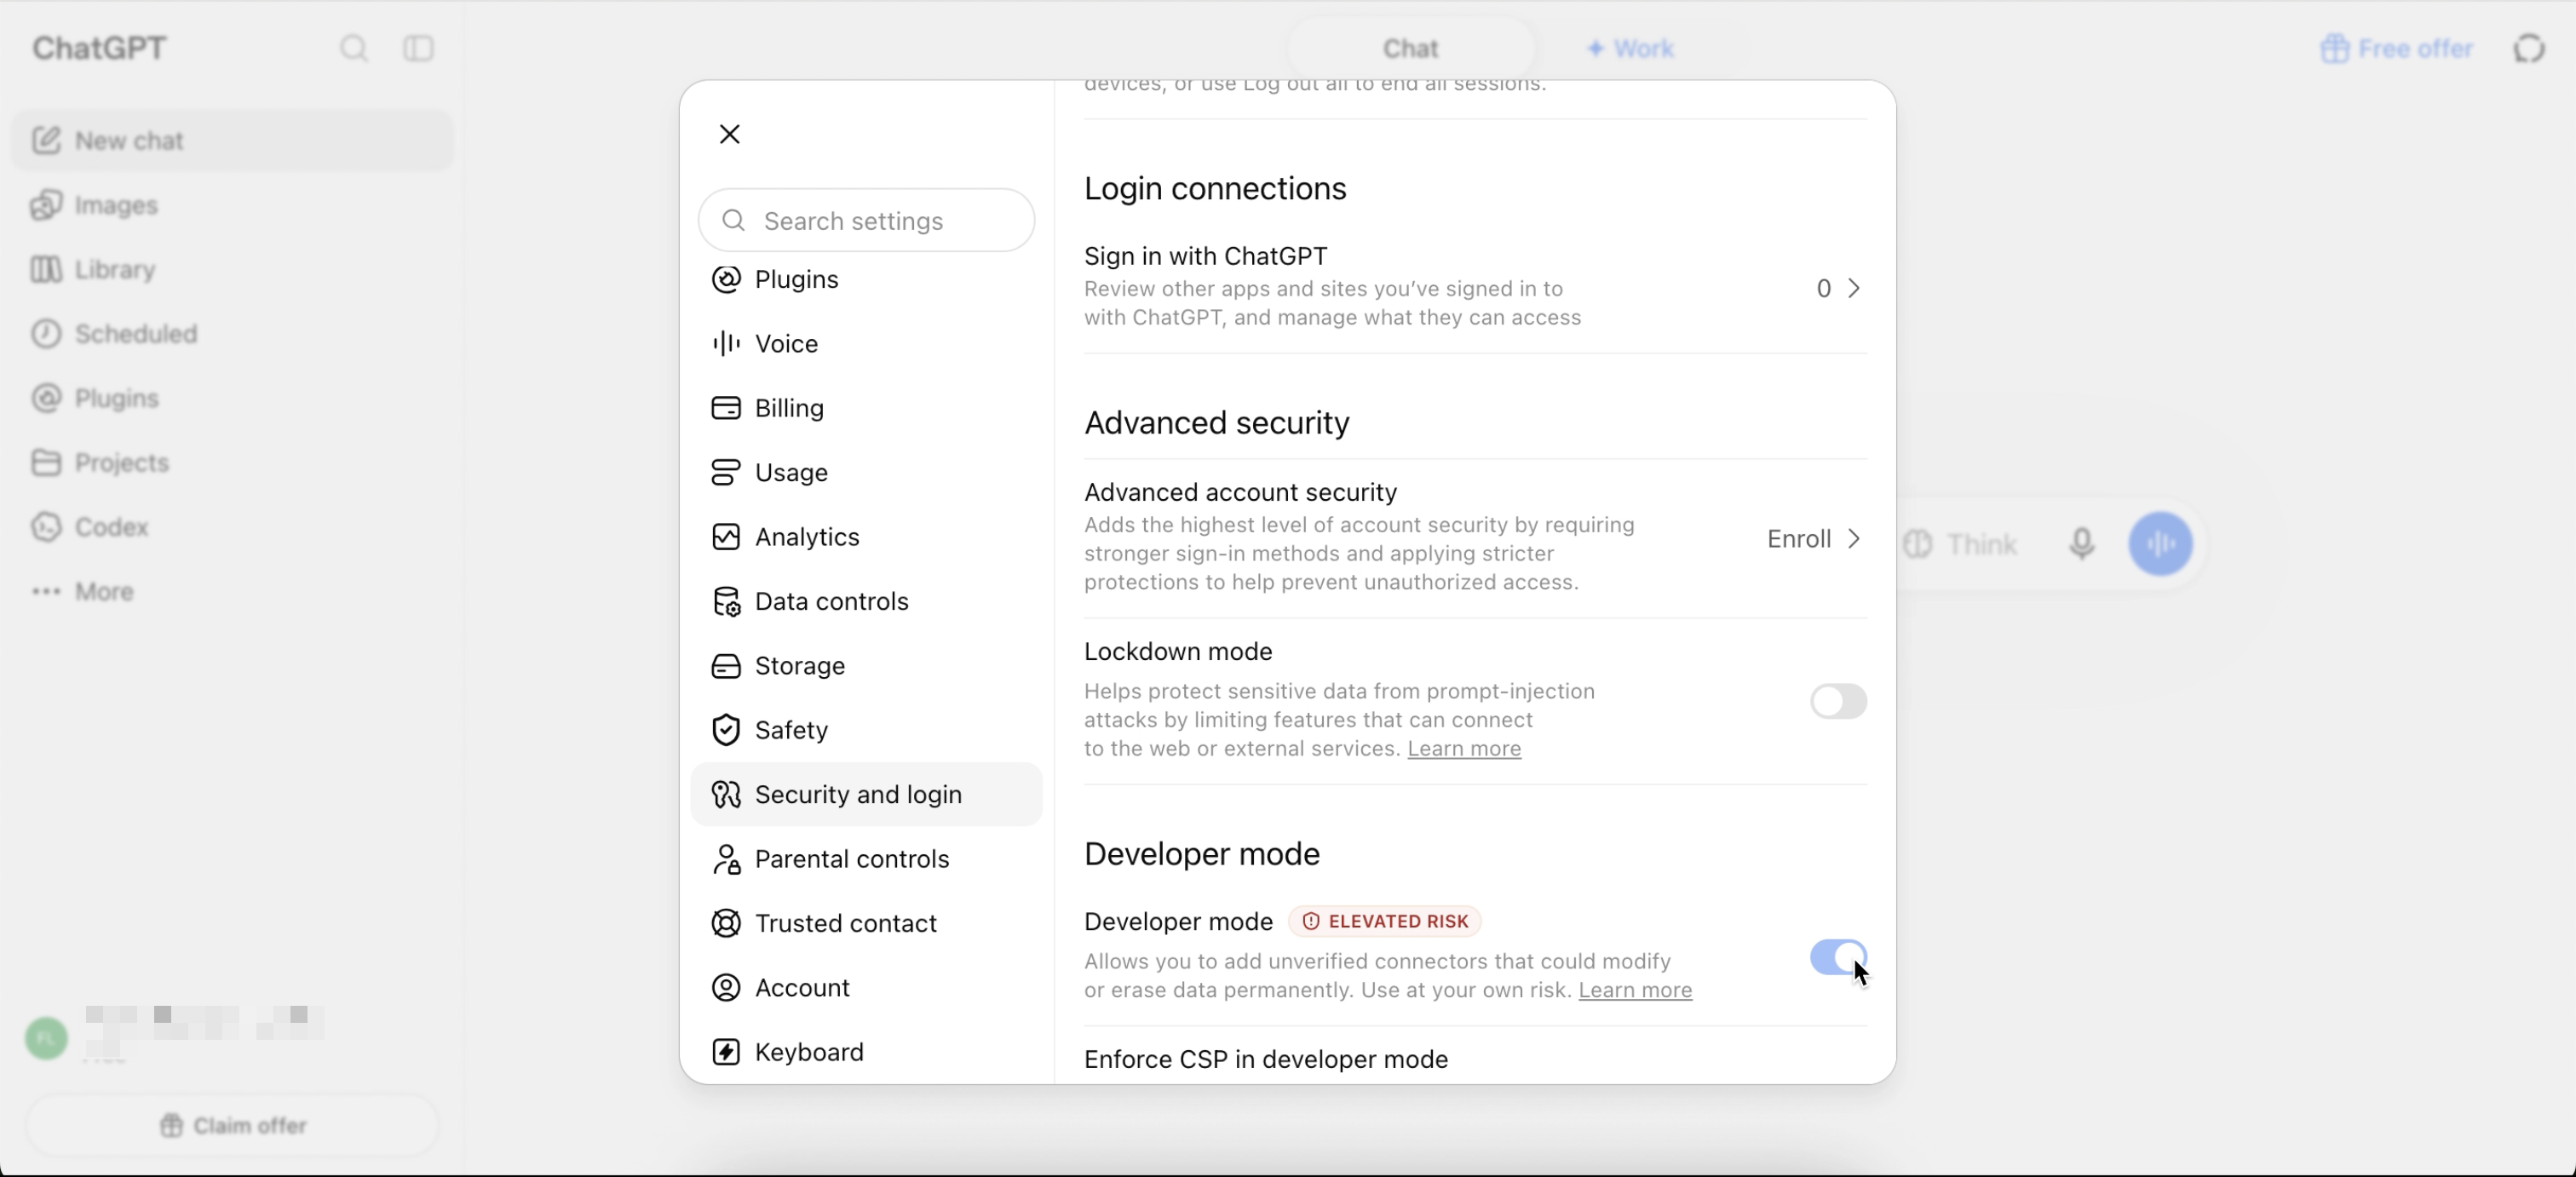
- Open Settings → Apps & Connectors → Advanced settings and turn on Developer mode. On Business, Enterprise and Edu, a workspace admin may need to allow it first.
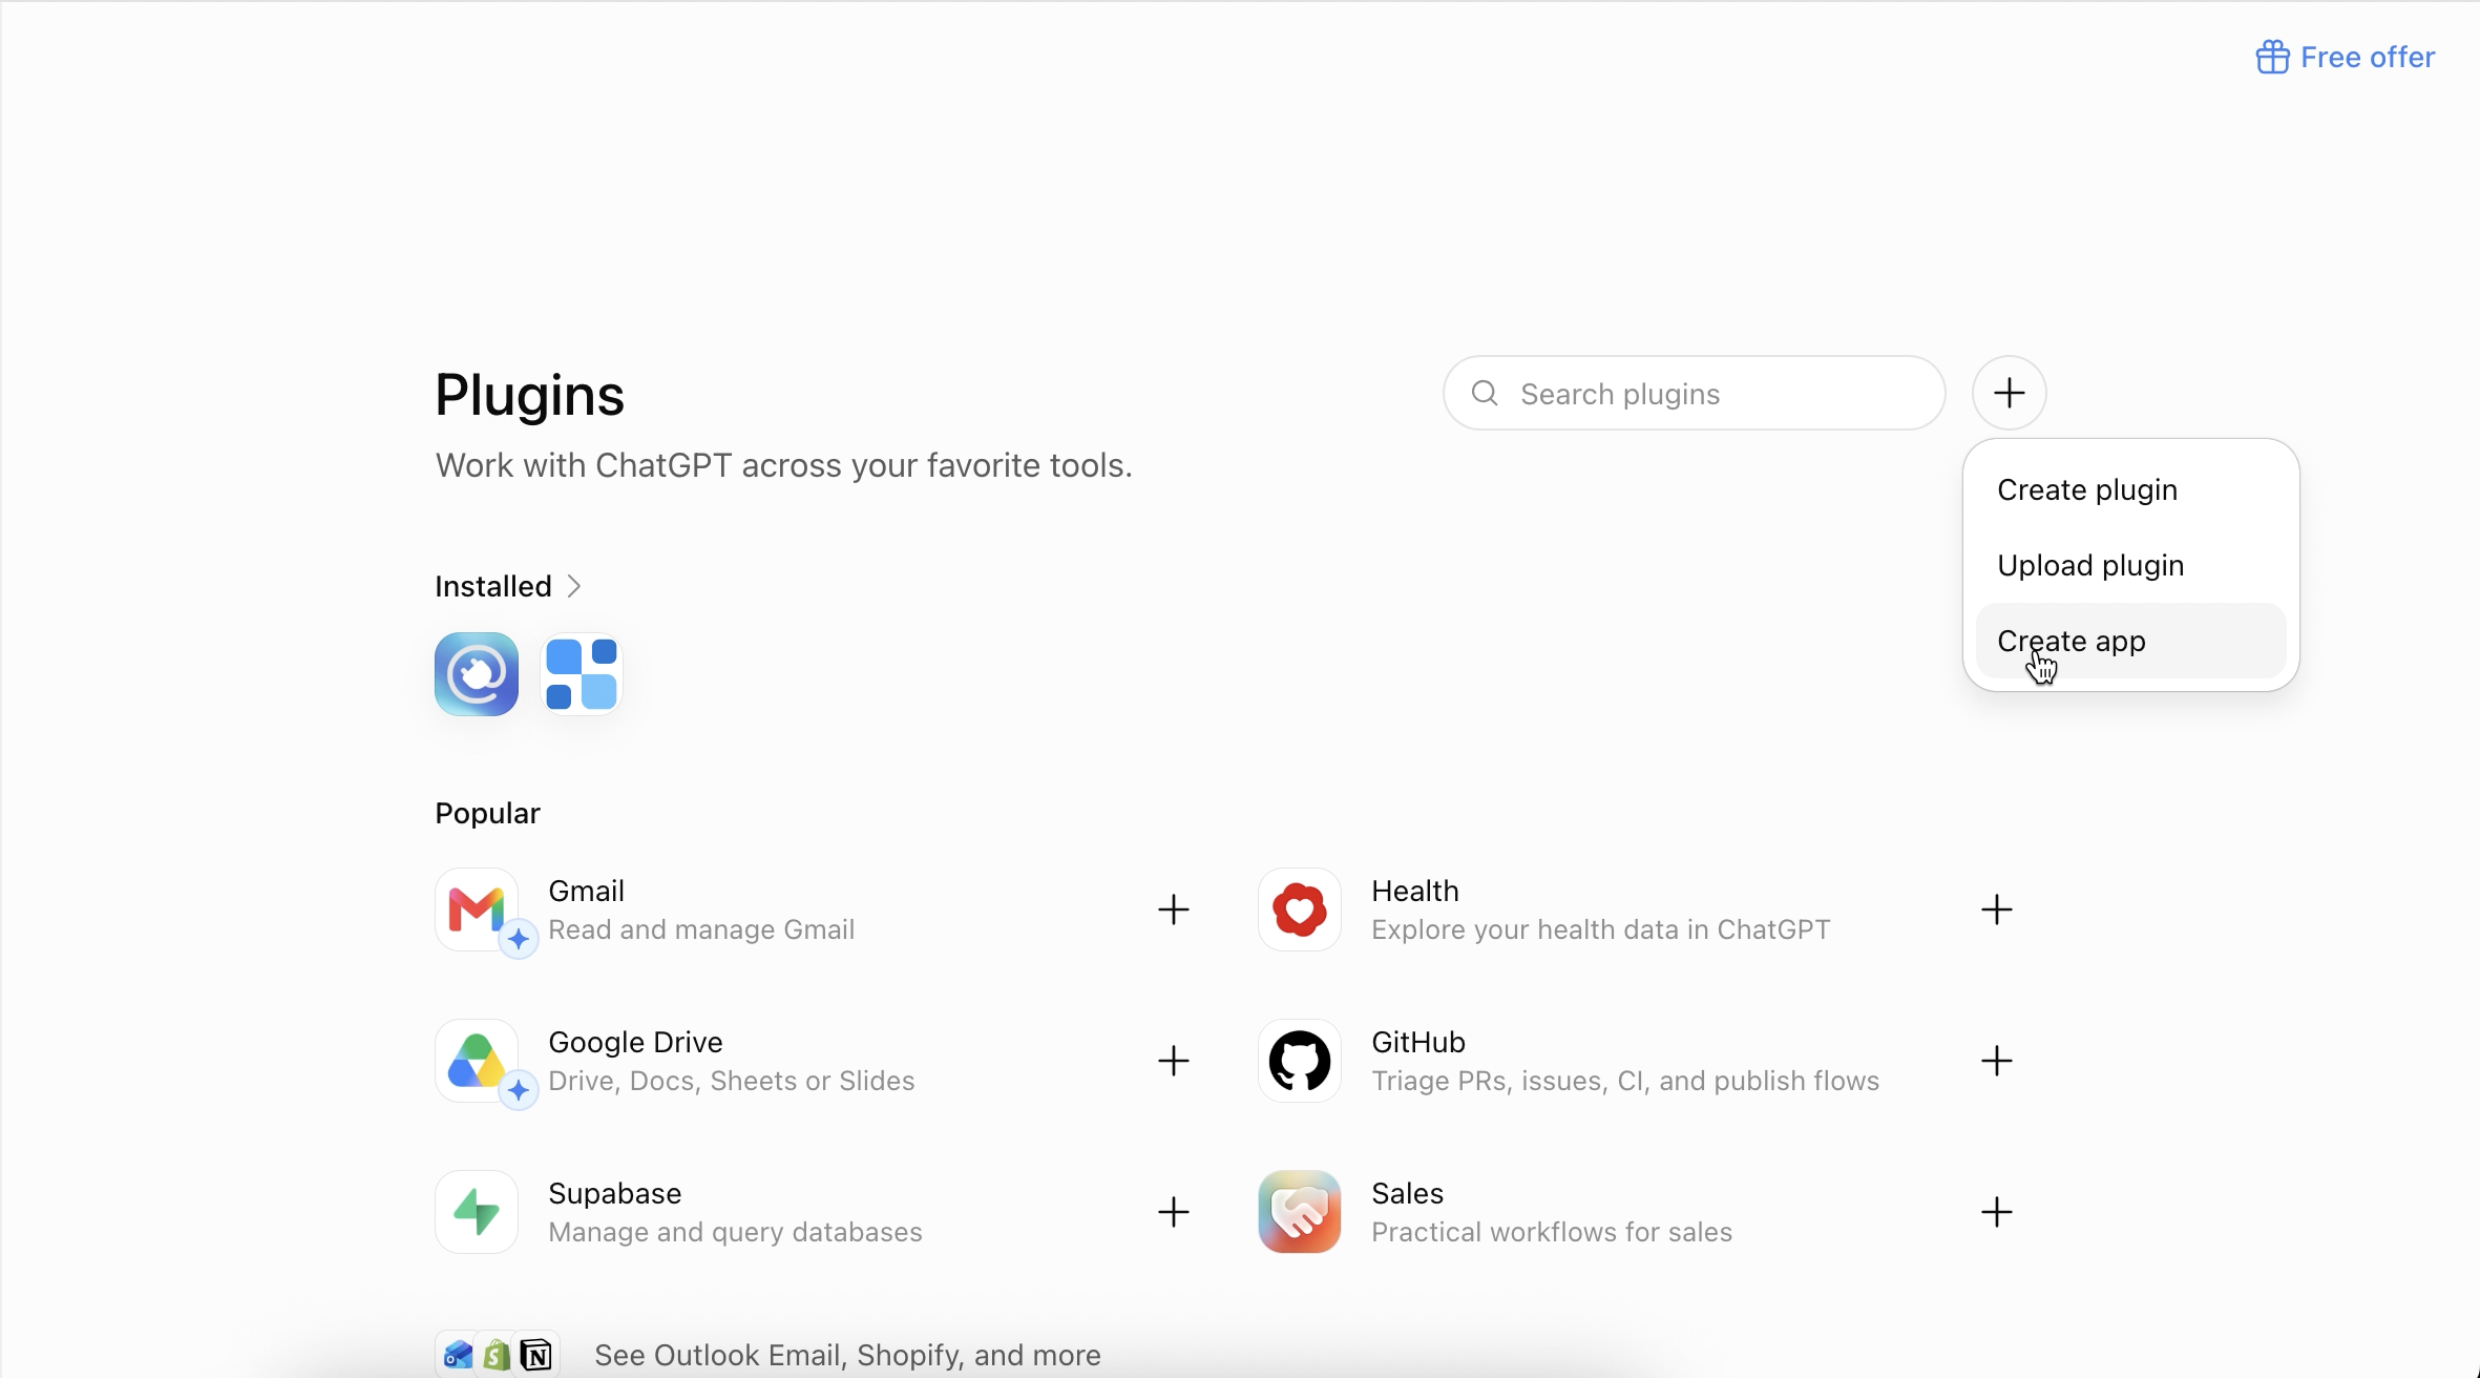
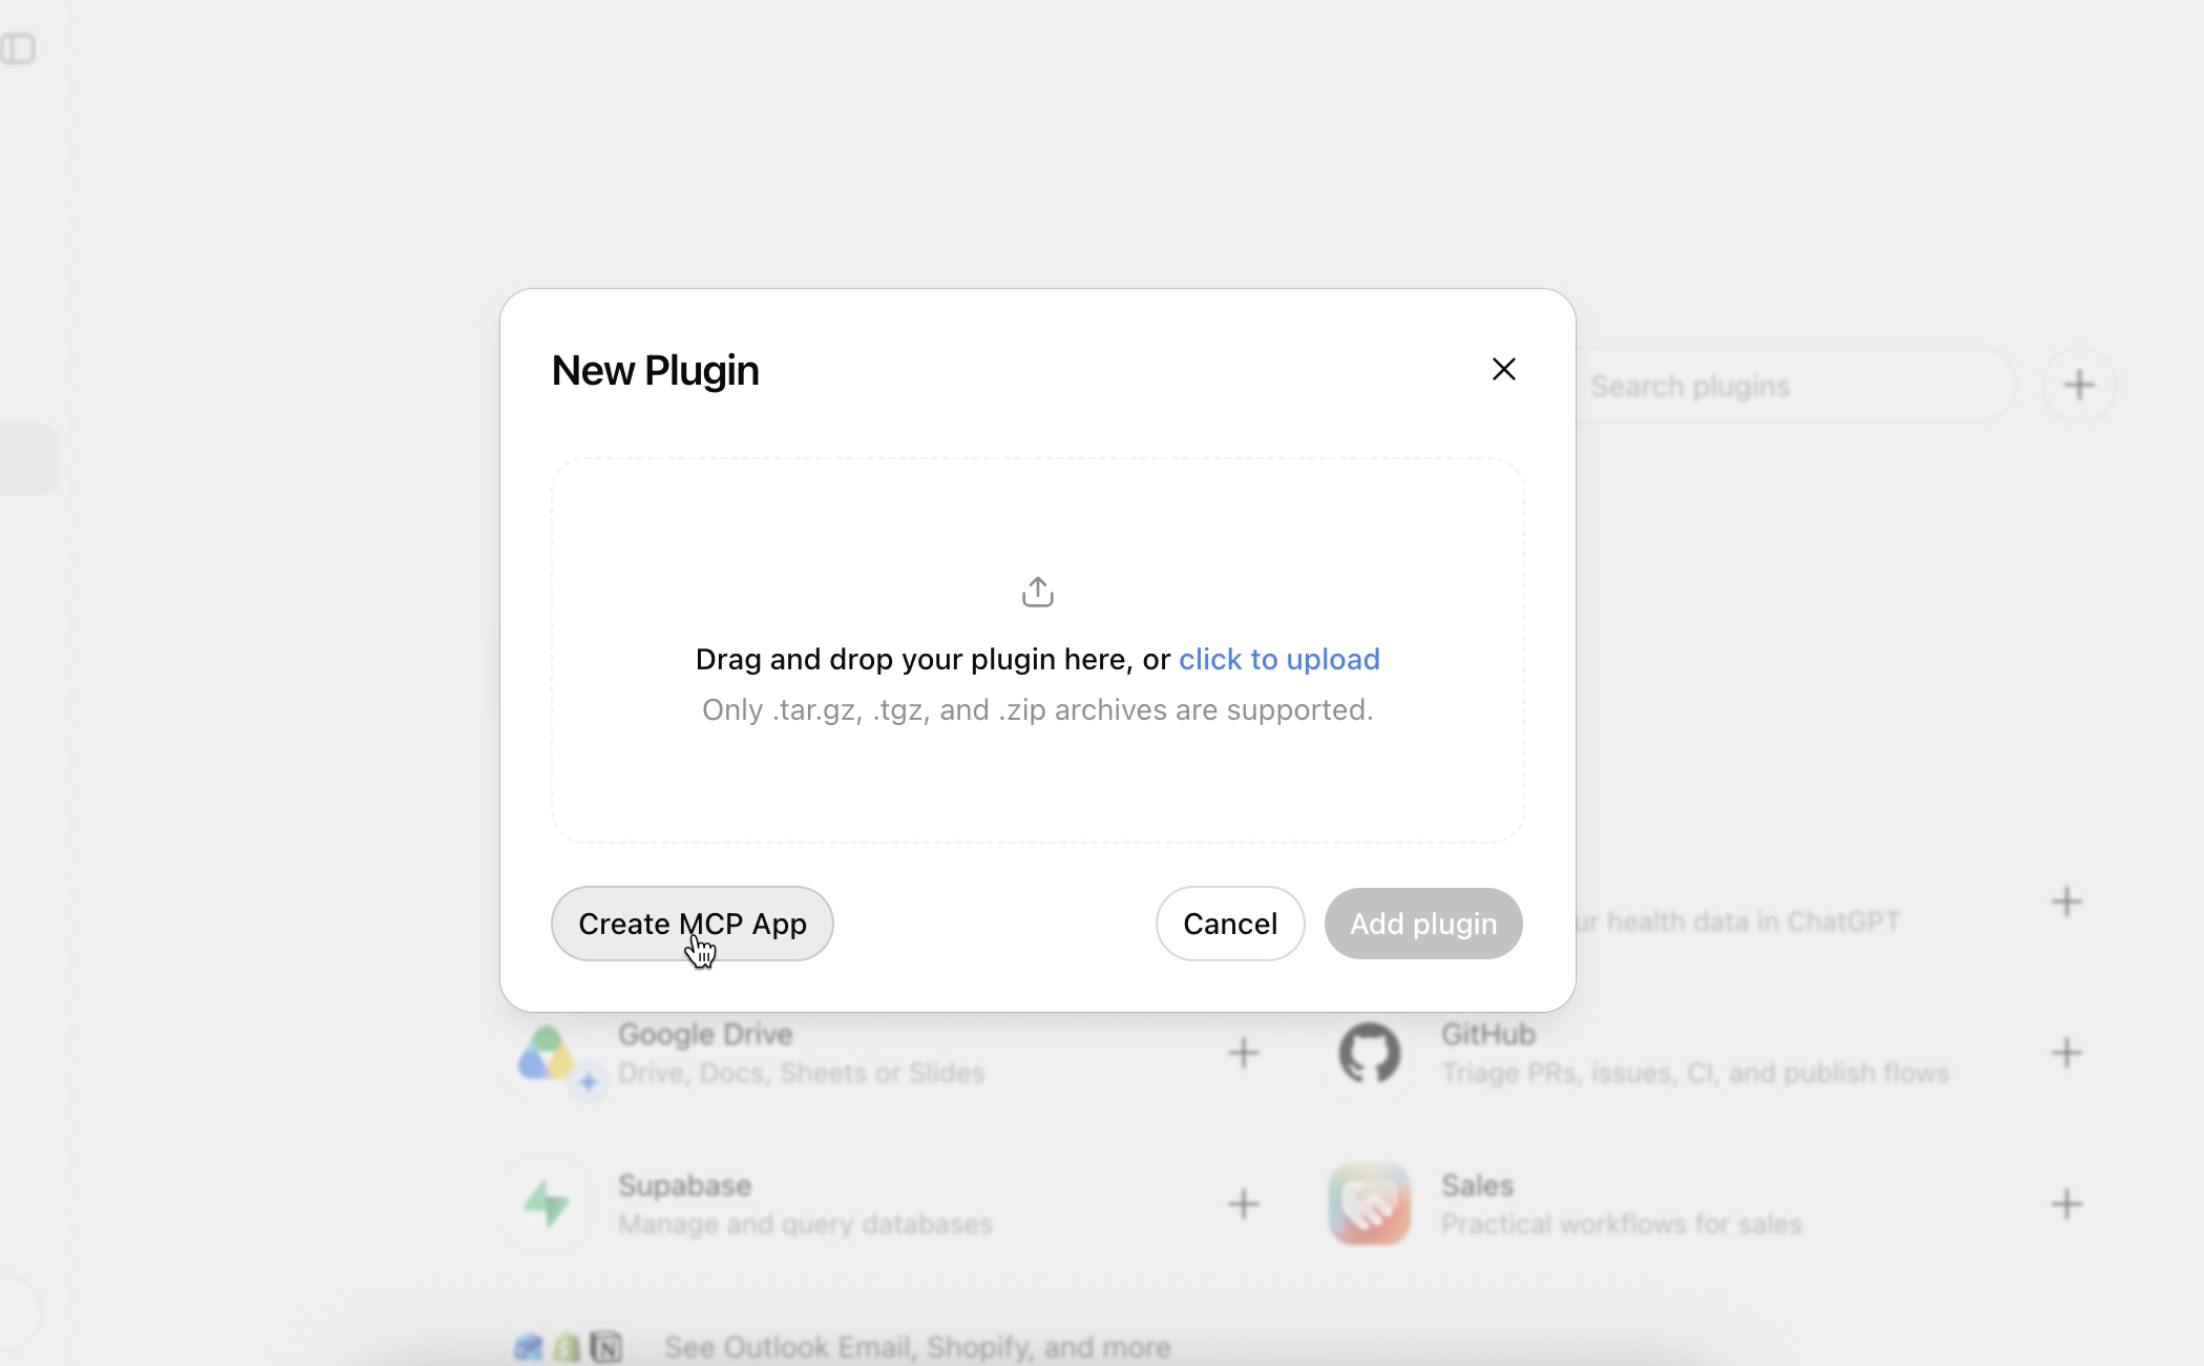
- In the same section, click Create (or Add custom connector).
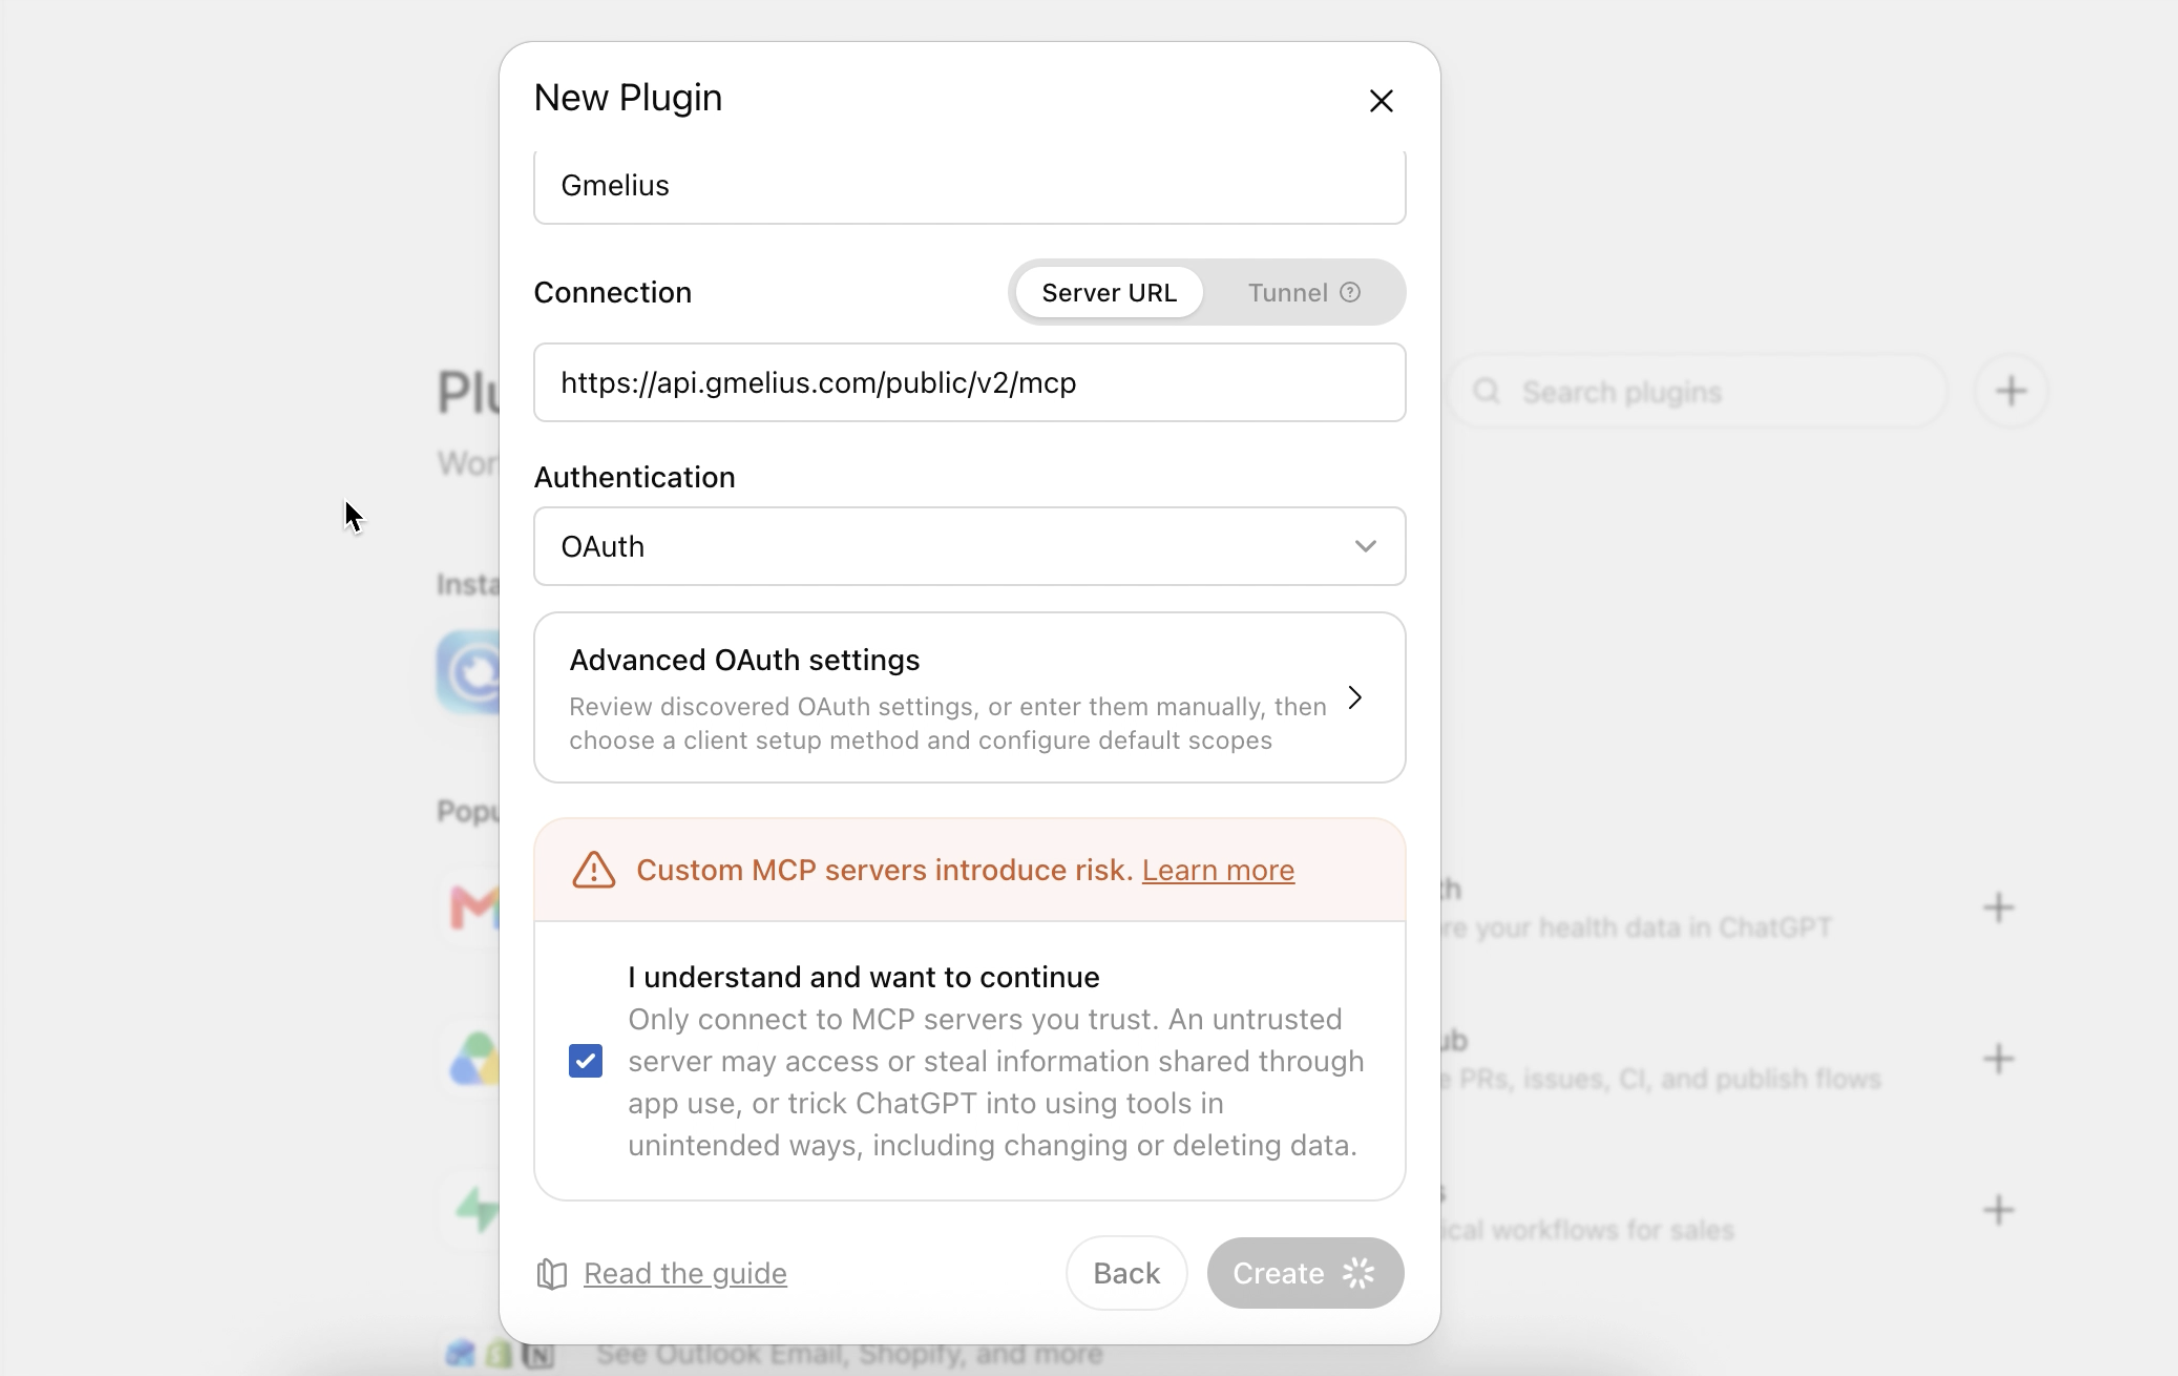
- Name it
Gmelius, pastehttps://api.gmelius.com/public/v2/mcp, choose OAuth authentication, and save. - Sign in to Gmelius when ChatGPT opens the sign-in page.
- In a new chat, click +, select Gmelius.
If you see "This MCP server doesn't implement our specification", Developer Mode is not enabled for that chat or account.
Gemini
Gemini has three places to add Gmelius, each with different requirements.
| Surface | Who can use it | Where to set it up |
|---|---|---|
| Gemini app (gemini.google.com) | Gemini Spark users, 18+, in the US, English only, Keep Activity on | Web app → Settings & help → Connected Apps |
| Gemini Enterprise, Business edition | Team administrators | business.gemini.google → Manage team → Connected apps |
| Gemini CLI | Anyone | ~/.gemini/settings.json |
Gemini app (Google help)
- On a computer, go to gemini.google.com and open Settings & help → Connected Apps.
- Under Custom apps for Spark, click Add a custom app and paste
https://api.gmelius.com/public/v2/mcp. - Click Next and sign in to Gmelius. The app then works in Gemini Spark on web and mobile.
Gemini Enterprise (Google help)
Gemini Enterprise uses a pre-registered OAuth client, so you need a client ID and secret for Gmelius before you start. Contact Gmelius support to get them.
- In business.gemini.google, select your team, then Manage team → Connected apps → Add MCP Server.
- Enter the server URL, then the client ID, client secret and the authorization details provided by Gmelius.
- Click Add. The connection is disabled by default: switch it on after adding it.
Gemini CLI
Add this to ~/.gemini/settings.json:
{

            "mcpServers": {

              "gmelius": {

                "httpUrl": "https://api.gmelius.com/public/v2/mcp"

              }

            }

          }
Start gemini, run /mcp auth gmelius to sign in, then /mcp to check the tools are listed.
Google Antigravity
Antigravity 2.0, the Antigravity IDE and Antigravity CLI share one config file: ~/.gemini/config/mcp_config.json (Windows: %USERPROFILE%\.gemini\config\mcp_config.json), or .agents/mcp_config.json for a single project. Antigravity uses serverUrl; url and httpUrl are not accepted.
The quickest way is from the terminal with Antigravity CLI:
agy mcp add -t http gmelius https://api.gmelius.com/public/v2/mcp
Or add the entry to the file by hand:
{

            "mcpServers": {

              "gmelius": {

                "serverUrl": "https://api.gmelius.com/public/v2/mcp"

              }

            }

          }
Save the file, restart Antigravity, then sign in:
- IDE or Antigravity 2.0: Customizations → Installed MCP Servers → Authenticate next to Gmelius.
- CLI: start
agyand open the/mcppanel.
If sign-in fails
OAuth support in Antigravity is still uneven between versions. Use the mcp-remote bridge instead, which handles sign-in in your browser (requires Node.js):
{

            "mcpServers": {

              "gmelius": {

                "command": "npx",

                "args": ["-y", "mcp-remote", "https://api.gmelius.com/public/v2/mcp"]

              }

            }

          }
Coding tools and other clients
Most editors read a JSON config file. Add the Gmelius entry, restart the tool, and sign in when it prompts you.
| Tool | Config file | Entry |
|---|---|---|
| Cursor | ~/.cursor/mcp.json (or .cursor/mcp.json per project) |
"gmelius": { "url": "https://api.gmelius.com/public/v2/mcp" } under mcpServers |
| VS Code / GitHub Copilot | .vscode/mcp.json |
"gmelius": { "type": "http", "url": "https://api.gmelius.com/public/v2/mcp" } under servers |
| Windsurf | ~/.codeium/windsurf/mcp_config.json |
"gmelius": { "serverUrl": "https://api.gmelius.com/public/v2/mcp" } under mcpServers |
In VS Code, you can also run MCP: Add Server → HTTP from the command palette and let the editor write the file. Use Copilot Chat in Agent mode to call the tools.
Any other MCP client (Zed, Cline, Goose, Claude Desktop config file…)
If the tool supports remote servers, paste the URL in its MCP settings. If it only supports local (stdio) servers, bridge it with mcp-remote:
{

            "mcpServers": {

              "gmelius": {

                "command": "npx",

                "args": ["-y", "mcp-remote", "https://api.gmelius.com/public/v2/mcp"]

              }

            }

          }
mcp-remote opens the Gmelius sign-in page in your browser and relays the session to the tool. It needs Node.js installed.
Troubleshooting and FAQ
| Problem | What to do |
|---|---|
| No option to add a custom connector | Check your plan supports it (see each section). On team plans, ask your workspace admin to enable it. |
| Sign-in window never opens or fails | Remove the connector and add it again. In editors, use the mcp-remote config instead. |
| Connector added but no tools appear | Make sure it is switched on for the current chat (tools menu, or Developer Mode in ChatGPT). Restart editors after editing a config file. |
| An action says it needs approval | Most assistants ask you to confirm actions that change data (assign, tag, status). Approve the prompt, then retry. |
| "Unauthorized" after it worked before | Your session expired. Reconnect or re-authenticate the server. |
| Wrong URL error | Use the full URL, including the path: https://api.gmelius.com/public/v2/mcp. |
What can the assistant see?
Only the workspaces and conversations your own Gmelius account can access. It acts as you, so changes it makes (assignments, tags, notes) appear under your name.
Can it send emails?
No. It can create drafts, which you review and send yourself from Gmail.
How do I disconnect?
Remove the connector in your AI tool's settings, or delete the gmelius entry from the config file.
How did we do?
